Mistral 7B Fine-Tune Optimizedを解説! GPT-4を超える特化型AIモデルの全貌

はじめに
「Mistral 7B Fine-Tune Optimized」が登場しました。このモデルは、特定のタスクに特化したファインチューニングを可能にすることで、AIの新たな可能性を開きます。
Mistral 7B Fine-Tune Optimizedは、既存の大規模言語モデル「Mistral 7B」を基に、より特定のニーズに合わせたカスタマイズが可能なモデルです。このモデルは、従来のGPT-4などの汎用モデルと比較して、特定のタスクにおいて優れた性能を発揮することが期待されています。
この記事では、Mistral 7B Fine-Tune Optimizedの概要、GPT-4との比較など詳しく解説していきます。
ぜひ最後まで読んでみてください!
OpenPipe公式サイト
https://openpipe.ai/blog/mistral-7b-fine-tune-optimized
ARCHETYP Staffingでは現在クリエイターを募集しています。
エンジニア、デザイナー、ディレクター以外に、生成AI人材など幅広い職種を募集していますのでぜひチェックしてみてください!
Mistral 7B Fine-Tune Optimizedとは
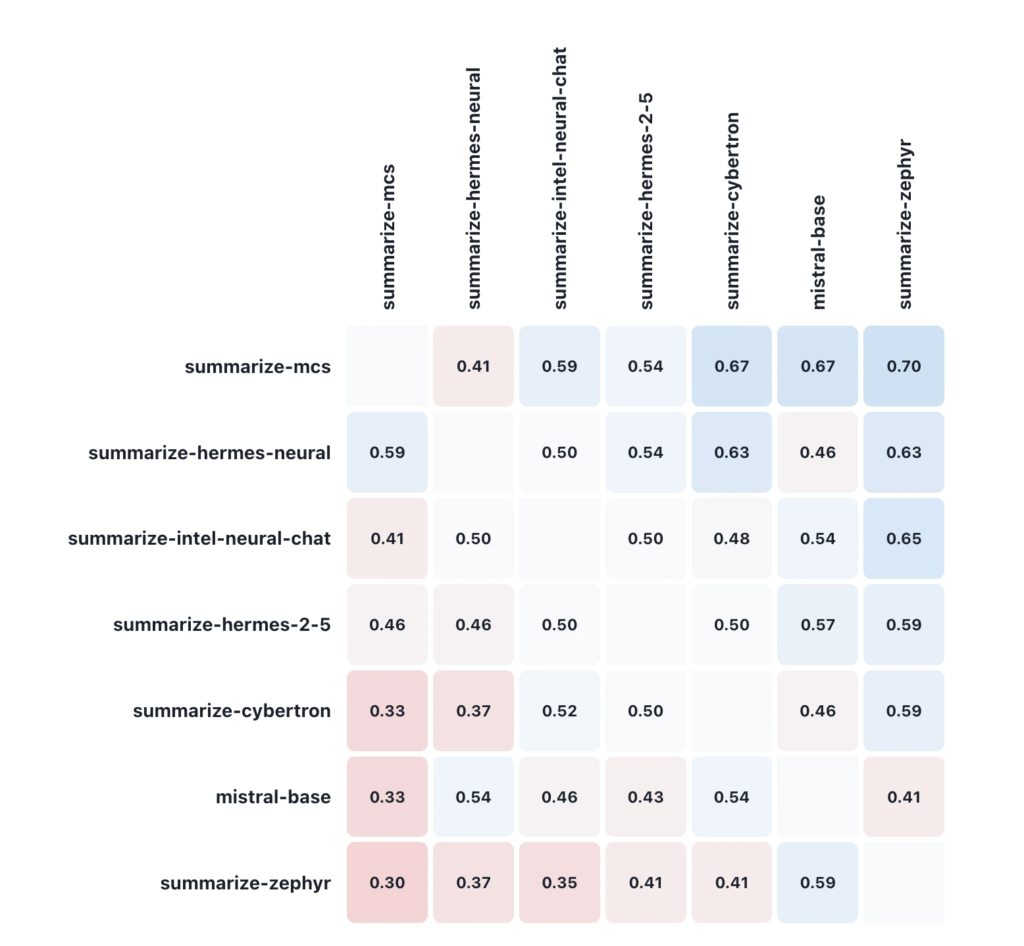
引用元:https://openpipe.ai/blog/mistral-7b-fine-tune-optimized
AIの世界では、モデルの能力がその効果を大きく左右します。その中で、「Mistral 7B Fine-Tune Optimized」という新しいモデルが注目されています。では、このMistral 7B Fine-Tune Optimizedとは一体何なのでしょうか?ここでは、その基本的な概念と特徴について解説します。
基本概念
Mistral 7B Fine-Tune Optimizedは、大規模なAI言語モデル「Mistral 7B」をベースとしたモデルです。
このモデルは、特にファインチューニングを目的として開発されました。ファインチューニングとは、AIモデルに特定のデータセットを追加して訓練し、特定のタスクやニーズに特化させるプロセスのことを指します。この手法により、Mistral 7B Fine-Tune Optimizedは、特定の用途において従来のモデルよりも高い精度と効率を実現します。
特徴と能力
Mistral 7B Fine-Tune Optimizedの最大の特徴は、その柔軟性と適応性にあります。
このモデルは、特定のタスクやアプリケーションに合わせて細かく調整することができます。
例えば、特定の言語スタイルや特定の主題に対する理解を深めるためにカスタマイズすることが可能です。これにより、より精度の高いテキスト生成や、より深いレベルの言語理解が期待できます。また、Mistral 7B Fine-Tune Optimizedは、その指示理解と推論能力においても最適化されています。これにより、より複雑な問いに対しても、より正確な回答を提供することが可能です。
例えば、技術的な文書の作成や、特定のトピックに関する詳細な質問に対する応答などが、従来のモデルよりも効果的に行えるようになります。
このモデルの柔軟性と適応性は、様々な分野での応用を可能にし、AIの未来を形作る重要な要素となるでしょう。
GPT-4との比較
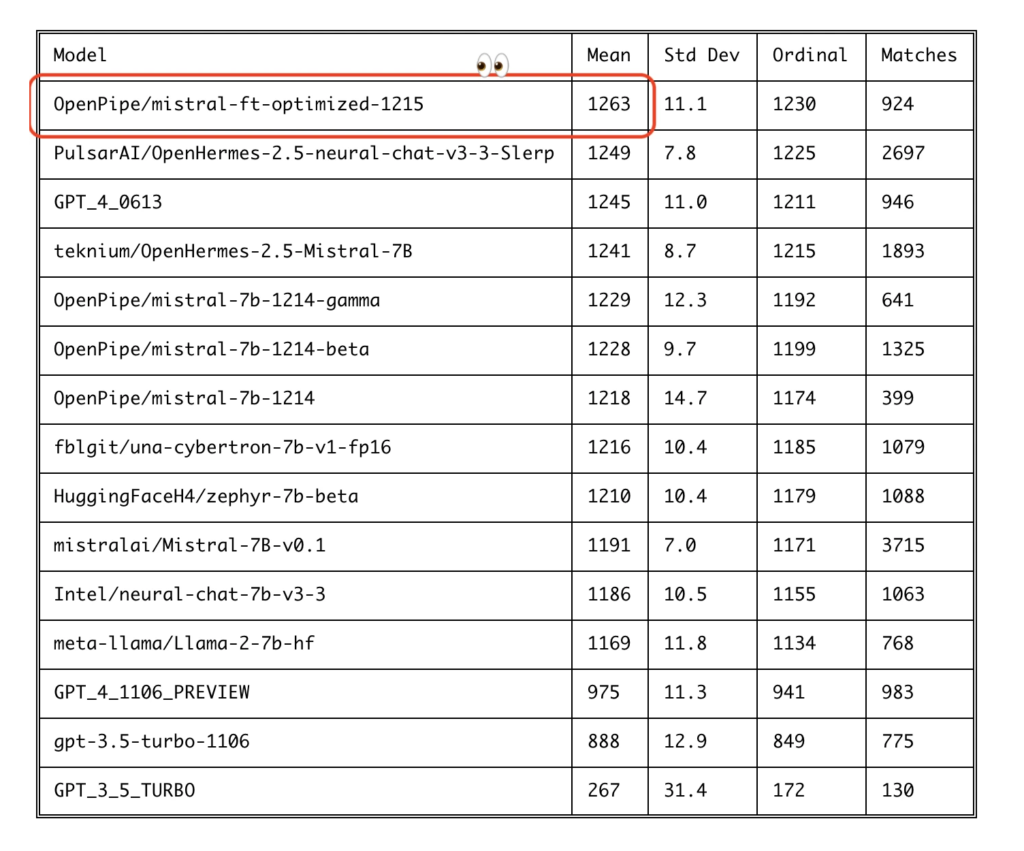
引用元:https://openpipe.ai/blog/mistral-7b-fine-tune-optimized
AI技術の世界では、モデル間の性能比較が重要な議論の一つです。
特に「Mistral 7B Fine-Tune Optimized」と「GPT-4」という二つのモデルの比較は、AIの進化において注目されています。
GPT-4の概要
GPT-4はOpenAIによって開発された、最先端の汎用言語モデルです。
このモデルは、大量のテキストデータから学習し、さまざまな言語タスクに対応可能です。
GPT-4は、その汎用性と強力な言語生成能力で知られており、文章作成、翻訳、要約など幅広い用途で使用されています。
性能比較
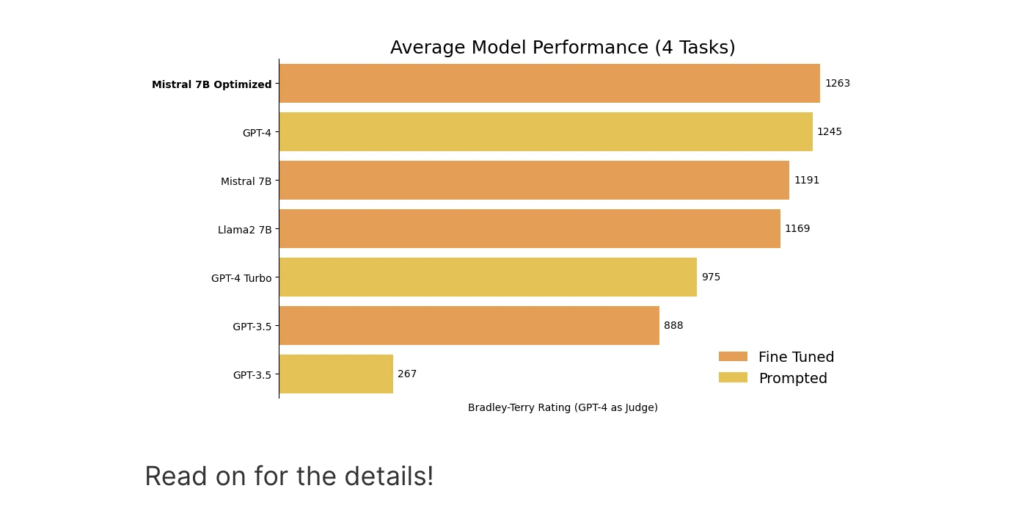
引用元:https://openpipe.ai/blog/mistral-7b-fine-tune-optimized
GPT-4はその汎用性から、多くの異なるタスクに適用可能な強力なモデルです。しかし、特定の領域やタスクにおいては、Mistral 7B Fine-Tune Optimizedの方がより優れた性能を発揮することがあります。これは、Mistral 7B Fine-Tune Optimizedが特定のデータセットやシナリオに対してファインチューニングされているため、その領域における理解がより深く、より関連性の高い回答を生成できるからです。
GPT-4は幅広い用途に適応できる一方で、Mistral 7B Fine-Tune Optimizedは特定のタスクや分野における深い理解と精度を提供します。
このため、用途や目的に応じて適切なモデルを選択することが、最大の効果を得るための鍵となります。
ファインチューニングのメリット
AIモデルのファインチューニングは、特定のタスクやニーズに対して最適化されたパフォーマンスを実現するための重要なプロセスです。
特に「Mistral 7B Fine-Tune Optimized」のようなモデルでは、ファインチューニングの効果は顕著です。このセクションでは、ファインチューニングの主なメリットについて解説します。
ターゲット特化のパフォーマンス向上
ファインチューニングの最大のメリットは、特定のタスクやシナリオにおけるパフォーマンスの向上です。Mistral 7B Fine-Tune Optimizedは、特定のデータセットや用途に合わせて調整されることで、その分野においてより正確で効率的な結果を提供します。これは、医療、法律、金融などの専門分野で特に有効です。
高度なカスタマイズ可能性
ファインチューニングにより、ユーザーはAIモデルを自分の特定のニーズに合わせてカスタマイズできます。
例えば、特定の言語スタイル、業界特有の用語、特定のテーマやトピックなど、特定の要件に合わせてモデルを調整することが可能です。これにより、ユーザーは自分の用途に最適化されたAIツールを持つことができます。
効率性と精度の向上
ファインチューニングされたモデルは、一般的なモデルと比較して、タスクをより迅速かつ正確に処理できます。これにより、時間とリソースを節約しつつ、より高品質な結果を得ることができます。
特に、複雑な問題解決や決定支援システムにおいて、この効率性と精度は非常に重要です。
競争優位の確立
特定の分野において高度に最適化されたAIモデルを使用することで、競合他社との差別化を図り、市場における競争優位を確立することが可能です。ファインチューニングにより、企業や組織は特定の分野でのリーダーシップを築くことができます。
ファインチューニングは、AIモデルの効果を最大限に引き出し、特定のタスクやニーズに合わせたカスタマイズを実現します。
まとめ
Mistral 7B Fine-Tune Optimizedモデルは、特定のタスクや用途に最適化されたAIのパワーを実現し、私たちの生活、仕事、そして社会全体に新たな価値をもたらすことでしょう。